Squid Proxy Cluster Automation
Matthew Hampton, Dito February 2022
Summary
Squid is a full-featured web proxy cache server application which provides proxy and cache services for HyperText Transport Protocol (HTTP), File Transfer Protocol (FTP), and other popular network protocols. Squid can implement caching and proxying of Secure Sockets Layer (SSL) requests and caching of Domain Name Server (DNS) lookups, and perform transparent caching. Squid also supports a wide variety of caching protocols, such as Internet Cache Protocol (ICP), the HyperText Caching Protocol (HTCP), the Cache Array Routing Protocol (CARP), and the Web Cache Coordination Protocol (WCCP).
Detailed information here: https://ubuntu.com/server/docs/proxy-servers-squid
Some cloud environments must be segmented from the Internet for security compliance purposes. A Squid Proxy cluster can help with this by allowing specific protocols through to specific subnets. Squid proxies support subnet based Access Control Lists (ACLs). This allows granular access to the cluster. Coupling security features of the software with load balancing capabilities of GCP creates a powerful solution with minimal cost.
See the typical Proxy Cluster setup illustrated below:
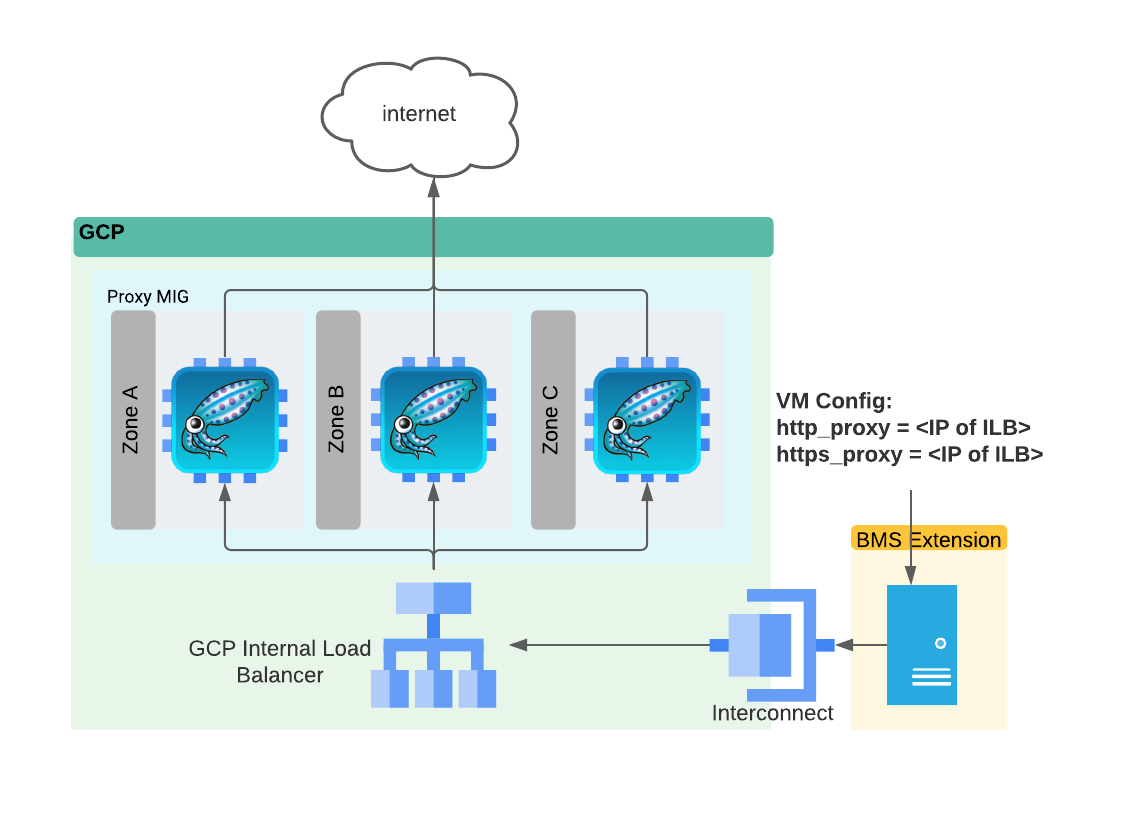
The purpose of this Terraform script is to create a customizable script to create such a cluster automatically within seconds.
Script Components
This script creates the following GCP objects:
- A VM Instance Template: This VM instance template houses the VM configurations along with its associated tags, firewall rules, start-up script, and “squid.conf” metadata entry.
- Instance Group Manager: An instance group manager is created referencing the aforementioned VM instance template. The instance manager then uses customized variables within the script to set health check parameters and group sizes.
- Internal Load Balancer: An internal load balancer is created to balance web proxy requests between each host in the instance group. This internal load balancer utilizes health checks to the proxy port of each host to ensure traffic is only sent to active hosts.
- OPTIONAL - Assign a Public IP: There is an optional line (line 104) in “main.tf” which will assign public IP address to each host if uncommented. This may be necessary in some environments.
How it Works
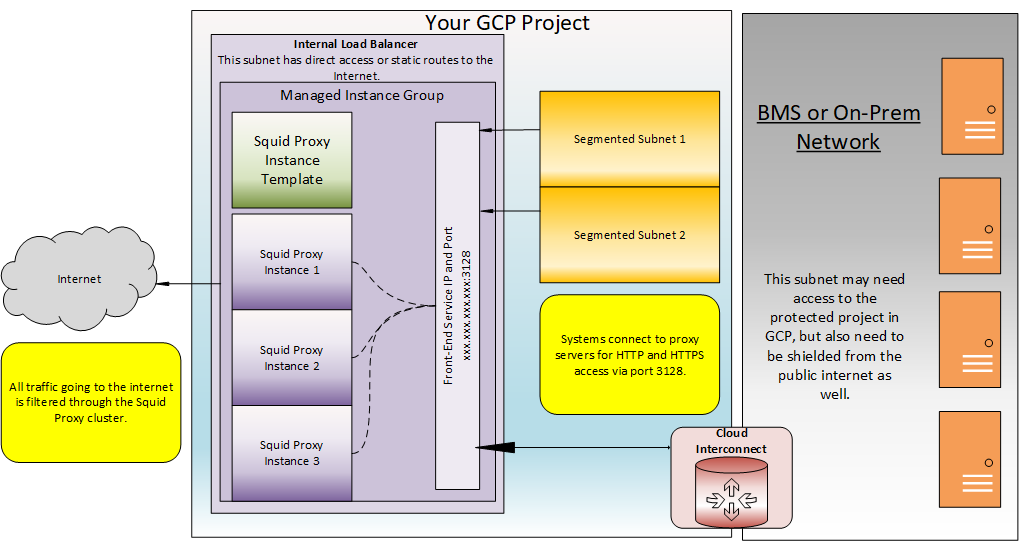
This script creates an internal load balancer and all accompanying components. At the end of the Terraform script there will be a fully functional squid proxy cluster in the project with the components below.
- VM Instance Template
- A Managed Instance Group w/ Autoscaler and Health check
- An Internal Load Balancer with Front End IP Address, and Port
See the purple boxes in the diagram below.
Terraform Variables
Customizations are achieved primarily through “variables.tf” and .tfvars files.The variables below are required to establish a connection to the GCP Project and settings the correct region. The following vars should be specified in a “.tfvars” file:
- “gcp_credentials”: Full path to a service account JSON key file.l (ie. ./keys.json)
- “project_name”: The project ID of your GCP project. For steps to get yours Click here.
- “project_vpc”: The GCP VPC network name for the cluster to be built in. For more information on creating and naming a VPC Click Here.
- “project_subnet”: The subnet in the VPC for the proxy cluster to be deployed to. To learn how to find yours Click Here.
- “project_region”: The GCP region that your VPC is built in.
- “project_zone”: The GCP zone that your VPC is built in.
These variables are pulled in at the point of execution by adding the “-var-file=” command switch to the terraform command. A complete sample command looks like this.
terraform destroy -var-file=./my.tfvars
NOTE: Terraform also automatically loads a number of variable definition files if they are present: Files named exactly “terraform.tfvars” or “terraform.tfvars.json”. Any files with names ending in “.auto.tfvars” or “.auto.tfvars.json”. If this is the case then the “-var-file” flag can be omitted when running terraform.
Formatting of the TFVARS file is different from the “variables.tf” file. It takes simple name/value pairs. However, all variables must be named in the “variables.tf” to be pulled into the script. Sample below:
gcp_credentials     = ./keys.json
project_name        = "my-google-project12323"
project_vpc         = "my-vpc-network"
project_subnet      = "proxy-cluster-subnet"
project_region      = "us-east1"
project_zone        = "us-east1-b"
The remaining variables are specified directly within the “variables.tf” itself. These variables are used to tweak the properties of the objects created within the GCP project.
- “service_root_name”: Root name that all cloud objects will be named with.
- “instance_environment”: Tag used to identify the compute instance template for dev, test, or prod.
- “internal_trusted_cidr_range”: Your internal CIDR range requiring access to this proxy.
- “external_trusted_cidr_range”: Your list of external allowed network ranges for SSH access.
- “autoscaling_max”: The maximum cluster size of the squid managed instance group.
- “autoscaling_min”: The minimum cluster size of the squid managed instance group.
- “autoscaling_cpu_target”: CPU target to create a new instance. For more information on this setting Click Here.
Startup.sh
The startup script is responsible for configuration of the VM instances. It’s contents is below:
#!/bin/bash
apt-get update
apt-get -y install squid3
curl "http://metadata.google.internal/computeMetadata/v1/instance/attributes/squid-conf" -H "Metadata-Flavor: Google" -o squid.conf
mv /etc/squid/squid.conf /etc/squid/squid.conf.old
mv ./squid.conf /etc/squid/
systemctl enable squid
systemctl restart squid
ufw allow 3128/tcp
systemctl status squid
- Line 1 - Sets the shell environment to be used. In this case, we are using a bash shell.
- Line 2 - Update all packages and repositories.
- Line 3 - Install Squid Proxy
- Lines 4-6 - Pull “squid-conf” metadata variable, copy it to a squid.conf, rename the default “squid.conf” file, and finally write the new “squid.conf” file to the location of the original.
- Lines 7-8 - Set squid daemon to auto-start with the OS. Restart the daemon to activate the new squid.conf.
- Line 9 - Allow TCP port 3128 through the local OS firewall.
- Lines 10 - Display squid daemon status. It should be healthy and running.
Squid.conf
The Squid proxy software is configured via the squid.conf file located under “etc/squid/”. The default config file is generic and requires changes to make it work. For information on all available configurations click here. Now let’s review the one provided in this script.
#Set the scope below to reflect the trusted subnet of your GCP project.
acl localnet src 10.0.0.0/20
#Assign safe_ports for ACL.
acl SSL_ports port 443
acl Safe_ports port 80		# http
acl Safe_ports port 443		# https
acl CONNECT method CONNECT
#Default:
# Deny, unless rules exist in squid.conf.
# Recommended minimum Access Permission configuration:
# Deny requests to certain unsafe ports
http_access deny !Safe_ports
# Deny CONNECT to other than secure SSL ports
http_access deny CONNECT !SSL_ports
# We strongly recommend the following be uncommented to protect innocent
# web applications running on the proxy server who think the only
# one who can access services on "localhost" is a local user
#http_access deny to_localhost
# INSERT YOUR OWN RULE(S) HERE TO ALLOW ACCESS FROM YOUR CLIENTS
#
# Example rule allowing access from your local networks.
# Adapt localnet in the ACL section to list your (internal) IP networks
# from where browsing should be allowed
http_access allow localnet
http_access allow localhost
# And finally deny all other access to this proxy
http_access deny all
# Squid normally listens to port 3128
http_port 3128
This file MUST BE edited for each specific project. The ACL must match the network subnet(s) being served by the cluster otherwise the servers will refuse service to unrecognized subnets. Line 2 is the primary focus here. It sets the local subnet that the ACL will allow requests from. One additional point is that more subnets can be added as shown below:
acl localnet src 10.0.0.0/8
acl localnet src 192.168.100.0/24
This ACL above is then referenced in the statement below which grants these subnets access to the proxy service.
http_access allow localnet
main.tf
This is the main script in Terraform housing the routines for creation and destruction of resources in the project. This script is broken down into the several sections detailed below.
Providers
This script requires Terraform v3.20.0 or greater. Therefore this is specified in a provider block at the beginning of the script. The script also interacts directly with Google and this is specified as well. Note too that all all beginning variables are pulled from “variables.tf”.
terraform {
  required_providers {
    google = {
      source = "hashicorp/google"
      version = "3.20.0"
    }
  }
}
provider "google" {
	credentials 	= file("${var.gcp_credentials}")
	project 		= var.project_name
	region  		= var.project_region
	zone    		= var.project_zone
}
Firewall Rules
Firewall rules have to be configured to allow incoming traffic on TCP port 3128 from specific internal & external CIDR blocks. These settings are specified in the “variables.tf” file.
The first rule allows traffic from Google service subnets and specific internal IP scopes for the proxy port. The se
resource "google_compute_firewall" "default_allow" {
	name    = "allow-${var.service_root_name}"
	network = var.project_vpc
	#130.211.0.0/22 and 35.191.0.0/16 are CIDR ranges for GCP IAP services.
	source_ranges = ["130.211.0.0/22", "35.191.0.0/16", var.internal_trusted_cidr_range]
	allow {
		protocol = "icmp"
	}
	allow {
		protocol = "tcp"
		ports    = ["3128"]
	}
	source_tags = ["${var.service_root_name}"]
}
resource "google_compute_firewall" "allow_ssh" {
	name    = "allow-ssh"
	network = var.project_vpc
	source_ranges = var.external_trusted_cidr_ranges
	allow {
		protocol = "tcp"
		ports    = ["22"]
	}
	source_tags = ["${var.service_root_name}"]
}
Create VM Instance Template
This code block accomplishes the following tasks:
- Creates an Ubuntu 18.04 Instance Template
- Creates a Service Account Template with the (cloud-platform) Role
- Assigns a Firewall Tag to the Template Enabling Traffic to the Instance on the Proxy Port
- Binds the Template to the Correct Network and Subnet
- Assigns the Start-Up Script and Sets a Metadata Variable for squid.conf
resource "google_service_account" "default" {
  account_id   = "${var.service_root_name}-svc"
  display_name = "Squid Proxy Service Account"
}
resource "google_compute_instance_template" "squid_server_templ" {
	name        = "${var.service_root_name}-template"
	description = "This template is used to create squid proxy instances."
	tags = ["squid-proxy"]
	labels = {
		environment = var.instance_environment
	}
	instance_description = "Squid proxy instance."
	machine_type         = "e2-micro"
	can_ip_forward       = false
	scheduling {
		automatic_restart   = true
		on_host_maintenance = "MIGRATE"
	}
	// Create a new boot disk from an image
	disk {
		source_image      = "ubuntu-os-cloud/ubuntu-minimal-1804-lts"
		auto_delete       = true
		boot              = true
	}
	metadata = {
    	squid-conf = file("./squid.conf")
  	}
	service_account {
    	# Google recommends custom service accounts that have cloud-platform scope and permissions granted via IAM Roles.
    	email  = google_service_account.default.email
    	scopes = ["cloud-platform"]
  	}
	metadata_startup_script = file("./startup.sh")
	network_interface {
    	network = var.project_vpc
    	subnetwork = var.project_subnet
		#Uncomment the line below to allow a public IP address on each VM.
		#access_config {}
  	}
}
Create Managed Instance Group, Health-Check, and Autoscaler
This code block accomplishes the following tasks:
- Creates a Health Checker on Port 3128
- Creates a Managed Instance Group with the Template above and the Health Check above
- Creates an Associated Autoscaler to size the cluster
resource "google_compute_health_check" "tcp-health-check" {
name = "${var.service_root_name}-health-check"

timeout_sec        = 1
check_interval_sec = 5

tcp_health_check {
	port = "3128"
}
}
resource "google_compute_instance_group_manager" "squid_igm" {
	name = "${var.service_root_name}-igm"

	base_instance_name = "${var.service_root_name}"

	named_port {
		name = "proxy-port"
		port = "3128"
	}

	version {
		instance_template  = google_compute_instance_template.squid_server_templ.id
	}

	target_size  = 2

	auto_healing_policies {
		health_check      = google_compute_health_check.tcp-health-check.id
		initial_delay_sec = 200
	}

}
resource "google_compute_autoscaler" "autoscaler" {
name   = "${var.service_root_name}-autoscaler"
target = google_compute_instance_group_manager.squid_igm.id

autoscaling_policy {
	max_replicas    = var.autoscaling_max
	min_replicas    = var.autoscaling_min
	cooldown_period = 60

	cpu_utilization {
	target = var.autoscaling_cpu_target
	}
}
}
Create Backend Service and Internal Load Balancer
This code block accomplishes the following tasks:
- Creates a Backend Service for the MIG from Above
- Creates a Frontend Load Balancer for the MIG
resource "google_compute_region_backend_service" "default" {
  	load_balancing_scheme = "INTERNAL"

  	backend {
    	group          = google_compute_instance_group_manager.squid_igm.instance_group
  	}

  	name        = "${var.service_root_name}-backend"
 	protocol    = "TCP"
  	timeout_sec = 10
 	health_checks = [google_compute_health_check.tcp-health-check.id]
}
resource "google_compute_forwarding_rule" "main_fr" {
	name = "${var.service_root_name}-frontend"
  	network               = var.project_vpc
	subnetwork 			  = var.project_subnet
  	backend_service       = google_compute_region_backend_service.default.self_link
  	load_balancing_scheme = "INTERNAL"
  	ports                 = ["3128"]
}
Output the Load Balancer IP Address
This code block simply outputs the IP address of the load balancer front end for the Squid proxy cluster.
output "squid_proxy_ilb_ip" {
  	value       = google_compute_forwarding_rule.main_fr.ip_address
  	description = "The target for the internal load balancer."
}
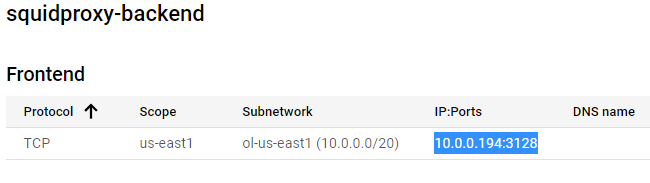
Alternately, you can verify the load balancer information by following the steps below:
- Go to the Google console.
- Select your project.
- Go to the Load Balancers page.
-
Select the load balancer named with the “Service root name”-backend.

-
At the top of the page, you should see an “IP:Ports” field which specifies your load balancer IP address and port.
Proxy Usage
Individual apps need to be configured to use the proxy
yum and dnf
Edit the proxy setting in /etc/yum.conf as shown in the example below
proxy=http://squid-proxy.my.domain.com:3128
Add proxy_username and proxy_password if the proxy server has been configured to require authentication:
proxy=http://squid-proxy.my.domain.com:3128
proxy_username=yumacc
proxy_password=clydenw
apt
Edit /etc/apt/apt.conf
Acquire::http::Proxy "http://squid-proxy.my.domain.com:3128";
Acquire::https::Proxy "http://squid-proxy.my.domain.com:3128";
Authenticated requests take the form:
Acquire::http::Proxy "http://username:password@ squid-proxy.my.domain.com:3128";
Acquire::https::Proxy "http://username:password@ squid-proxy.my.domain.com:3128";
curl
Use the -x argument to pass the proxy:
curl -x squid-proxy.my.domain.com:3128 https://example.com
wget
Edit /etc/wgetrc
use_proxy=yes
http_proxy=squid-proxy:3128
https_proxy=squid-proxy:3128
Oracle
Add proxy ip and port to an access control list. Example:
BEGIN
   DBMS_NETWORK_ACL_ADMIN.CREATE_ACL (
    acl          => 'api-acl.xml',
    description  => 'Permission to access external APIs',
    principal    => 'TRACKER',
    is_grant     => TRUE,
    privilege    => 'connect');
   COMMIT;
END;
/

create role apiaccess;
BEGIN
   DBMS_NETWORK_ACL_ADMIN.ADD_PRIVILEGE (
    acl          => 'api-acl.xml',
    principal    => 'APIACCESS',
    is_grant     => TRUE,
    privilege    => 'connect',
    position     => null);
   COMMIT;
END;
/

BEGIN
   DBMS_NETWORK_ACL_ADMIN.ASSIGN_ACL (
    acl          => 'api-acl.xml',
    host         => 'squid-proxy.my.domain.com',
    lower_port   => 3128,
    upper_port   => 3128);
   COMMIT;
END;
/
Update utl_http calls to use the proxy. Example:
  UTL_HTTP.SET_PROXY('squid-proxy.my.domain.com:3128');
  req := UTL_HTTP.BEGIN_REQUEST('https://api.weather.gov/gridpoints/SLC/99,174/forecast', 'GET', 'HTTP/1.1');
Node Package Manager
npm config set proxy http://squid-proxy:3128
gcloud sdk
gcloud config set proxy/type http
gcloud config set proxy/address squid-proxy
gcloud config set proxy/port 3128
git
git config --global http.proxy http://squid-proxy:3128
Copyright © Dito LLC, 2023