- Install OLVM Engine for use with Google BMS
- Install OLVM Engine on a GCP VM
- Accessing the OLVM engine
- OLVM Engine backup/restore scripts
- Identity Aware Proxy (IAP)
- Overview
- Register an alternate FQDN for the OLVM Engine
- Create an unmanaged instance group and add the VM to it
- Create a Classic HTTPS load balancer
- Add a firewall rule to allow IAP traffic
- Create an OAuth Consent screen for the GCP Project
- Enable IAP for the backend service
- Grant IAP-secured-Web-App-User role to users of the backend service
- Test
Install OLVM Engine for use with Google BMS
Peter Goldthorp, Dito. June 2022
How to install Oracle Linux Virtualization Manager (OLVM) Engine on a GCP Compute Engine VM for use with Google Bare Metal Solution. This document assumes knowledge of OLVM
Install OLVM Engine on a GCP VM
OLVM 4.4 requires an Oracle Linux 8.5 (or later) environment. Oracle Linux is not included in GCP’s standard OS images. A custom image must be created. The steps for doing this are described in the Compute Engine documentation and summarized below.
Prerequisites
You will log in to your Oracle Linux VM on GCP using the Serial Console instead of SSH. By default, GCP Projects do not support Serial Console unless you take steps to enable it: https://cloud.google.com/compute/docs/instances/interacting-with-serial-console
Create an Oracle Linux boot image template in GCP
- Download the latest OL8 image from https://yum.oracle.com/oracle-linux-templates.html in .ova format.
- Load it to a GCS bucket
gsutil -m cp ./OL8U6_x86_64-olvm-b126.ova gs://dito-oracle - Create a compute instance from the .ova file
gcloud compute instances import oracle-linux-8u6-base \ --source-uri=gs://dito-oracle/OL8U6_x86_64-olvm-b126.ova \ --os=rhel-8-byol \ --project=dito-oracle-dev \ --subnet=ol-us-east1 \ --zone=us-east1-b --machine-type=e2-standard-2 - SSH into the VM and set a root password
- Shutdown the instance
gcloud compute instances stop oracle-linux-8u6-base \ --project=dito-oracle-dev --zone=us-east1-b - Create boot image from boot disk
 gcloud compute images create oracle-linux-8u6 \
 --project=dito-oracle-dev \
 --family=oracle-linux --source-disk=oracle-linux-8u6-base \
 --source-disk-zone=us-east1-b --storage-location=us \
 --description=Oracle\ Linux\ minimal\ install\ base\ environment
Provision an Oracle Linux VM with a static internal IP address and no external IP
Use the GCP console to create a new VM based on the custom image from the previous step.
- Set the name, region, zone and network as normal
- Pick
e2-standard-2as a machine type. Note: The minimum hardware spec for OLVM is a 2 core VM with 4 GB RAM. Oracle recommends a 4 core VM with 16 GB of available system RAM. The recommended spec assumes OLVM will be actively managing a virtualized environment with multiple KVM hosts. An e2-standard-2 (2 core with 8 GB RAM) is sufficient for an environment where OLVM is only required to pin CPU cores for licensing purposes - For the boot disk, choose
changethen pick the custom image. - Select
Standard persistent diskand do not change the size - Turn off automatic restart
- Block project-wide SSH keys
- Open the network-interface drop down and set External IPv4 address to None
After the VM is created, it should start to boot up. Then:
- On the GCP console, select Compute Engine -> VM Instances. Click your VIrtualization Manager VM. Next to the “SSH” list box, select Serial Console Port 1, and click Serial Console. (you may need to edit the VM and enable “Enable connecting to serial ports “) Note: Do not SSH to the VM especially through oslogin. Use the serial console only.
- When the console window pops up and asks “login:”, login as “root” and with the password you created for the VM Template.
Install the OLVM engine on the new VM
Follow the installation instructions in the OLVM Getting Started guide:
dnf config-manager --enable ol8_baseos_latest
dnf install oracle-ovirt-release-el8
dnf clean all

dnf install ovirt-engine
engine-setup --accept-defaults
The engine-setup command will ask you to supply a password. Make a note of this for later use.
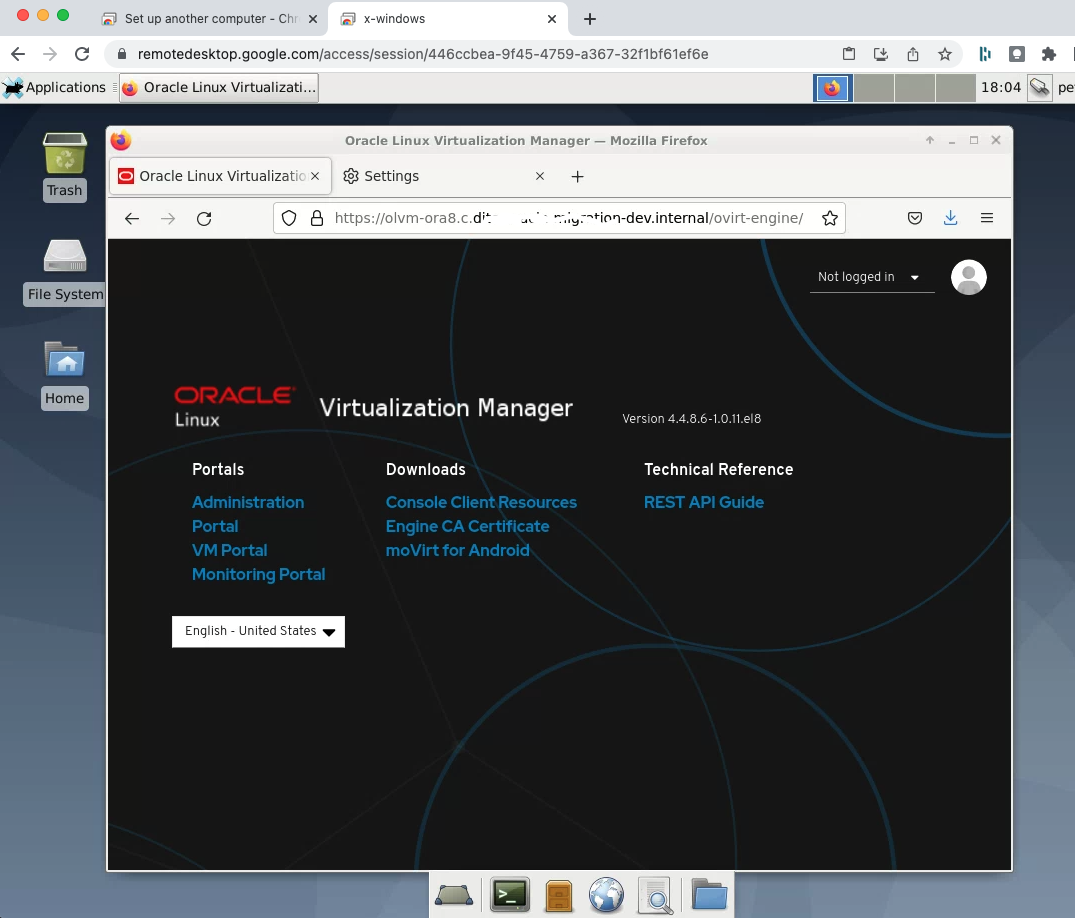
Accessing the OLVM engine
The OLVM Engine is accessed via a browser but is running on a VM with no external IP address. Create a remote desktop environment to access it.
Set up an X-Windows jump server
- Create a Linux VM to act as an X-Windows jump server.
- Machine Type: e2-standard-2
- Boot Image: Debian, Debian GNU/Linux, 10 (buster)
- Disk Size: ~ 100 GB - create an image with enough space to for the iso and VM template images that you plan to use in your BMS environment
- Same project, region and zone as the OLVM Engine VM
- Follow the instructions in Setting up Chrome Remote Desktop for Linux on Compute Engine to set up an Xfce based remote desktop
- Test the connection to the OLVM Engine using its internal FQDN
- The OLVM Engine uses a self signed TLS certificate. Acknowledge the security warnings to access the home page.
Connect to the OLVM Engine
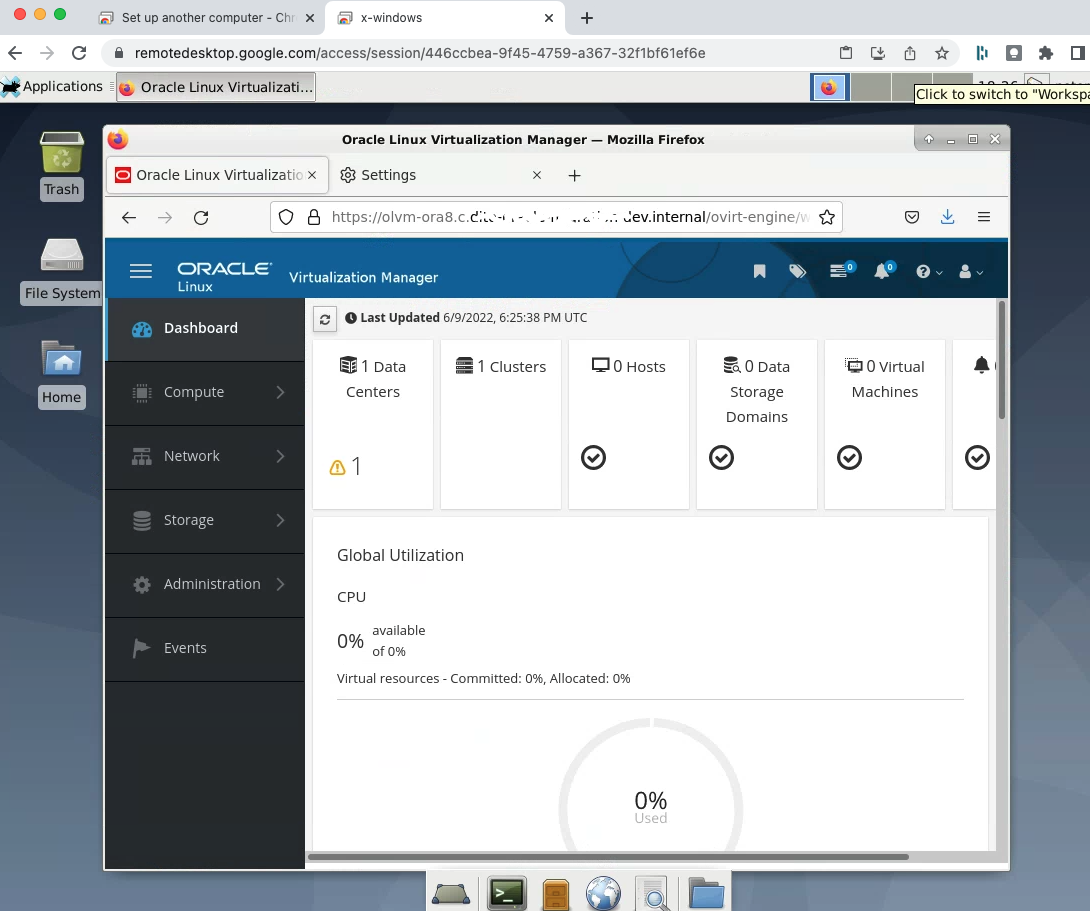
Open Firefox in the X-Windows remote desktop to access OLVM
-
Click on the
Engine CA Certificatelink to download a resource file for the certificate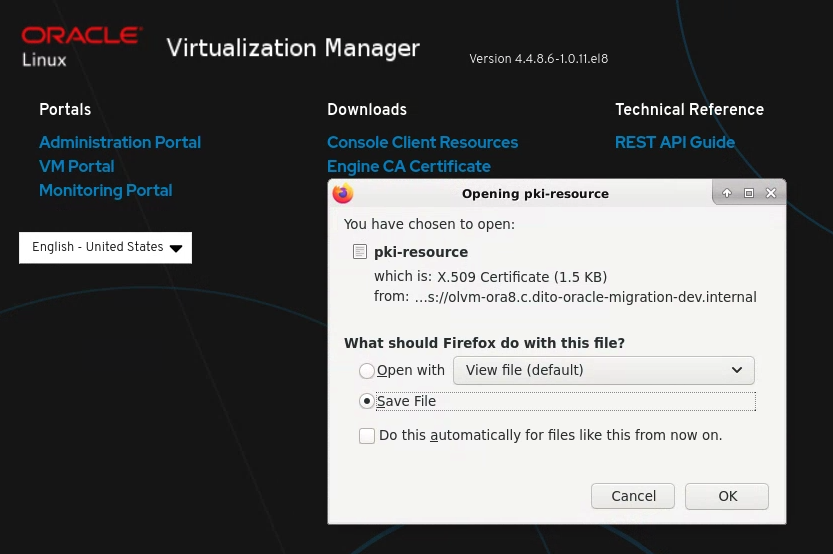
- Follow the browser specific instructions for setting up a Certificate Authority
-
Login with a username of admin and the password you supplied while installing the engine
OLVM Engine backup/restore scripts
Dito developed shell scripts are available that can be used to automate the OLVM Engine backups and restoration.
- olvm_backup.sh - backup the OLVM engine and copy the file to a cloud storage bucket.
- olvm_restore.sh - restore OLVM engine from a backup
- daily_olvm_crontab.txt - crontab entry to schedule olvm_backup_daily.sh to run at 00:00 once a day
- download_olvmbkps_fromgcs.sh - this script to download OLVM backup files from object store GCS to local disk on particular folder
- check_vm_status.sh - diagnostic script to check VM status if OLVM Engine is unavailable
The olvm_backup.sh script is designed to be included in a crontab as shown in the daily_olvm_crontab.txt file. It calls the engine-backup command to backup the OLVM engine and then uploads the backup to a cloud storage bucket. The script deletes backups on local disk that are more than 3 days old. Older backups are retained in the storage bucket. Global variables at the beginning of the script are used to control file locations. These should be edited before use.
Set up instructions
OLVM Engine DR plan uses a combination of shell scripts and disk snapshots to protect environment metadata.
Shell script installation
- Authenticate as a user with admin privileges in your GCP project
gcloud auth login - Optional set environment variables to simplify service account creation. Substitute your values for items in square brackets
 gcloud config set project [project-id]
 export GCP_PROJECT=$(gcloud config get-value project)
 export GCS_BUCKET=gs://[cloud-storage-bucket-name]
 export GCP_SERVICE_ACCOUNT=[new-service-account-name]
example
gcloud config set project my-gcp-project export GCP_PROJECT=$(gcloud config get-value project) export GCS_BUCKET=gs://my-bms-olvm-backups export GCP_SERVICE_ACCOUNT=bms-olvm-backups - Create a Cloud Storage bucket to store your backups using terminal using below command:
gsutil mb -c nearline -l us -p $GCP_PROJECT --pap enforced $GCS_BUCKET - Create a service account to write backup files to Cloud Storage using below command:
gcloud iam service-accounts create $GCP_SERVICE_ACCOUNT - Give the service account admin access to Cloud Storage:
gcloud projects add-iam-policy-binding $GCP_PROJECT \ --member "serviceAccount:${GCP_SERVICE_ACCOUNT}@${GCP_PROJECT}.iam.gserviceaccount.com" \ --role "roles/storage.objectAdmin" - SSH into the VM and use
sudo -sto become root - Download the service account keys:
gcloud iam service-accounts keys create ora-backup-olvm.json \ --iam-account=${GCP_SERVICE_ACCOUNT}@${GCP_PROJECT}.iam.gserviceaccount.com - Configure the gsutil command-line tool on the vm
gcloud auth activate-service-account --key-file ./ora-backup-olvm.json - Download and extract the OLVM backup/restore scripts
- Edit the global variables in the
olvm_backup.shscript - Schedule a cron job to call olvm_backup_daily.sh
- Monitor the file system backup location and storage bucket for at least 4 days to verify the last 3 days of backup files are available locally and all backups are available in cloud storage.
Scheduled snapshots
Scheduled snapshots are a mechanism provided in GCP to backup Compute Engine persistent disks. The OLVM Engine and its databases are contained on the boot disk of its VM. Follow the instructions in the scheduled-snapshots documentation to schedule a regular backup of the disk.
Create a snapshot schedule with an 8 hour frequency and a 7 day retention period. Associate the schedule with the OLVM VM boot disk.
Compute Engine settings
Use the Cloud Console UI to verify the following settings for the Compute Engine VM that the OLVM Engine is installed on.
- Basic information -
Deletion protectionis Enabled - Storage -
When deleting instanceis set to Keep disk
Usage instructions
See the disaster-recovery-procedures.md file in the docs directory
Identity Aware Proxy (IAP)
The OLVM Engine can be protected using IAP to provide read-only access to it. The proxy protected UI supports a subset of OLVM features. Actions that require a direct connection between the browser and the OLVM Engine instance will not work. Examples of this include VM creation and ISO image uploads.
Overview
The installation process involves the following steps:
- Register an alternate FQDN for the OLVM Engine
- Create an unmanaged instance group and add the VM to it
- Create a Classic HTTPS LB with the unmanaged instance group as a backend service and a Google managed cert in the Frontend
- Add a firewall rule to allow IAP traffic
- Create an OAuth Consent screen for the GCP Project
- Enable IAP for the backend service
- Grant IAP-secured-Web-App-User role to users of the backend service
Register an alternate FQDN for the OLVM Engine
Register the FQDN that you plan to use to access the engine as an SSO alternate. Login to the the OLVM Engine VM, create a systemctl conf file and restart the engine:
vi /etc/ovirt-engine/engine.conf.d/99-custom-sso-setup.conf

SSO_ALTERNATE_ENGINE_FQDNS="alias1.example.com alias2.example.com"

systemctl restart ovirt-engine
Create an unmanaged instance group and add the VM to it
IAP is implemented using a load balancer. GCP load balancers use instance groups to balance resources. Create an unmanaged instance group with a single VM instance for use as an IAP target.
- Open the GCP console and navigate to Compute Engine -> Instance groups
- Hit
CREATE INSTANCE GROUP - Select
New unmanaged instance group - Add the OLVM engine VM to the group and specify https 443 Port mapping
Create a Classic HTTPS load balancer
Create a Classic HTTPS LB with the unmanaged instance group as a backend service and a Google managed cert in the Frontend
- Navigate to Network services -> Load balancing in the GCP Console
- Hit
CREATE LOAD BALANCER - Select
START CONFIGURATIONforHTTP(S) Load Balancing - Select
From Internet to my VMs or serverless servicesandClassic HTTP(S) Load Balancer- Select the unmanaged instance group from the previous step as a Backend configuration
- Leave the Host and path rules unchanged
- Create a health check for the HTTPS protocol with
/ovirt-engine/theme-resource/faviconas a Request path - Select HTTPS as the protocol for Frontend configuration, reserve a new static IP address and create a new Google-managed certificate for the FQDN
- Hit
CREATEand wait for the LB and Google-managed certificate to become active. This may take up to 20 minutes
Add a firewall rule to allow IAP traffic
Create a firewall rule (Navigate to VPC Network -> Firewall) with the following properties:
| Property | Value |
|---|---|
| Name | allow-iap-traffic |
| Direction | Ingress |
| Action on match | Allow |
| Targets | All instances in the network |
| Source filter | IPv4 ranges |
| Source IPv4 ranges | 130.211.0.0/22 35.191.0.0/16 |
| Specified protocols and ports | tcp 443 |
Create an OAuth Consent screen for the GCP Project
- Navigate to APIs & Services -> OAuth consent screen
- Select
Internalas a User Type and hitCREATE - Enter an App name, User support and developer contact email
- Navigate through the remaining pages leaving other fields blank to complete the task
Enable IAP for the backend service
- Navigate to Security -> Identity-Aware Proxy
- Find the OLVM unmanaged instance group under HTTPS Resources - All Web Services - Backend Services
- Toggle the IAP button to enable Identity Aware Proxy for the resource
Grant IAP-secured-Web-App-User role to users of the backend service
- Navigate to (or remain on) the Identity-Aware Proxy page
- Select the check box in the OLVM unmanaged instance group row
- Use the Info Panel on the right of the screen to add or remove Principals
- Hit the
ADD PRINCIPALbutton - Enter the name of an existing user or group in the New principals field
- Use the
Select a roledropdown to associate the principal with theIAP-secured Web App Userrole - Hit the
SAVEbutton
- Hit the
Test
- Navigate to the OLVM’s FQDN in a New Incognito Window
- Verify a Sign in with Google dialog appears
- Login as a user with the IAP-secured Web App User role
- This should allow access to the OLVM UI
- Close all Incognito windows and repeat using a user without the role
- Verify you are not able to access the UI
Copyright © Dito LLC, 2023